Abstract
In Informix 4GL the only way to navigate an application is using a “ring” menu. This works very well when the application has a small number of modules with one menu but in complex applications, where there are many modules grouped into various submenus, the ring menu makes navigating the application very cumbersome. Modern alternatives such as tree-view and drop-down menus don’t exist in 4GL, but they do exist in Genero! This article discuss how best to navigate a Genero application:
Content
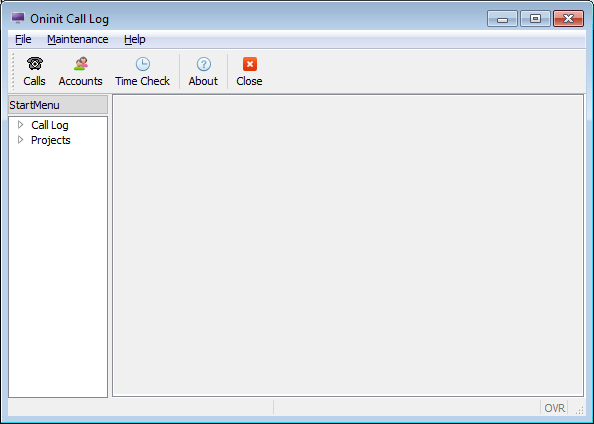
There are 3 ways to navigate a Genero application (see the screenshot below):
- a top menu (highlighted in red)
- It can have a tree structure, so if there are a lot of reports for this executable (for instance) they can be broken down into groups and be invoked from here, rather than having to have a huge line of buttons.
- a tool bar (highlighted in blue)
- Suitable for the principal functionality of the form, e.g. invoking other executables, or calling functions.
- and a start menu (highlighted in green)
- A tree structure menu for invoking executables, optionally including any which are also included in the Tool Bar. This can go down many levels, if required. Note that this implicitly invokes the equivalent of a ‘RUN . . . .’ statement, so is meant solely for executables. Each entry will default to ‘WITHOUT WAITING’, effectively, but this can be customized, entry by entry.
The top menu and tool bar are basically definitions of the buttons or menu entries, and requires code to define what is done when the button is clicked or the menu entry selected, as in a 4GL MENU block. If you are in a DIALOG then use ON ACTION, or if in a MENU you can use either COMMAND or ON ACTION.
The start menu is slightly different, in that the actions are specified within the menu definition, and are automatically invoked when the menu item is selected.
Example 1 – Tool Bar
This is best used for presenting functionality within a basic form, such as a maintenance form, as below.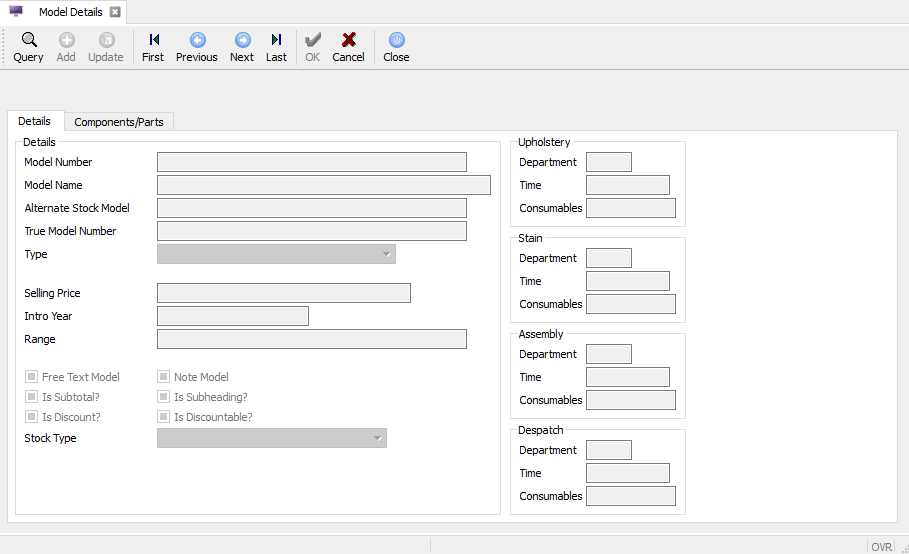
There are 3 ways to define it: in the ‘.per’ file; dynamically in the code; or imported from XML:
- In the ‘.per’ file – to a large extent this will mean it is hard coded SCHEMA default
- Dynamically, in the code
In this example the ”text” attribute is not defined, so that value will be loaded from the action defaults file which has been specified.As in the code above, one can conditionally build the toolbar, so some users can be given more options than others, for instance. There is also functionality in Genero to disable/enable buttons, as below, so when the user is updating an order for instance, the buttons (or menu entries) for producing reports related to that order can be greyed out and then re-enabled when the update is complete.
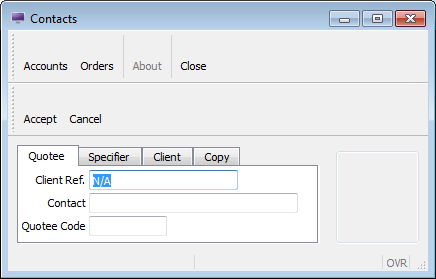
- Imported from an XML file
Some users may have global permissions for the application, some may be allowed to update things but not create them, and others may only have ‘read’ permissions – one can have multiple versions of the toolbar file and load them depending on which user has logged in, for instance. If there is already a tool bar defined in the form file, this action will not override it, but will simply add another tool bar to the window. In the screenshot below, the two buttons ‘Accept’ and ‘Cancel’ are defined in the form file, and the ‘Accounts’, ‘Orders’, ‘About’ and ‘Close’ buttons come from the file loaded using the statement as above.
However, if you load a second tool bar file, it will override that which was already loaded, but will leave that from the form file visible and usable. Also, if you import a tool bar and then use the code above to create items, they will be added to that which is already there, but the other way round will be an override. Note – there is also a method ‘ui.Interface.loadToolBar’, but this will load a default for all forms subsequently opened.
Example 2 – Top Menu
This is pretty much as for tool bars (see above). So again the options are; in the ‘.per’ file; dynamically in the code; or imported from XML: The same concepts apply as for the toolbar – an import will override that which has already been created, but following an import the code to build a top menu will add items to what is already there.Example 3 – Start menu
This is slightly different to the top menu and tool bar – because of the way it works it cannot be defined in the form file, so if you want a start menu you must either import one or build it in the code. So this time there are only 2 options; dynamically in the code; or imported from a file. There is another feature which does not apply to the start menu – you cannot create a second one. So if you have loaded the default start menu and need to add to it then obtain the id of the last created ‘child’ and add to that, as follows –Conclusion
As with other functionality Genero have added to 4GL, this can significantly improve user productivity, as all your application’s functionality can be available at the click of a button regardless of which aspect of the Genero application is currently in use.
Disclaimer
The above is provided “as is” without warranty of any kind, either express or implied, including without limitation any implied warranties of condition, uninterrupted use, merchantability, fitness for a particular purpose, or non-infringement.
Contact us
If you have any questions concerning the navigation of a Genero application and would like to find out more, simply contact us.