Abstract
With the popularity of home and coworking space working arrangements, along with company BYOD policies, being able to develop Genero applications from any location, and on different devices is becoming a must.
Genero Studio has had a client/server development model for a while; however, up until now, this has worked best in a LAN environment. Previously this relied on the client sharing a filesystem on the server, which required a fast and solid network connection between the two to be practical. Technologies such as SMB were not designed to run over the Internet, and doing so can be cumbersome and insecure.
Previously, the only work-around for this was to use a remote desktop solution, which could still be slow and impractical, especially when designing forms and reports. This also negates many of the benefits of having a modern workstation with fast processor and high-density display that can make Studio a joy to use.
Genero 3.20 introduced a new server synchronisation mode, where code is kept in sync between the local Studio installation and the server. This makes local development much more efficient. Also, by utilising the development licenses on the server, there is no need to worry about licensing individual workstations.
This article explores several options to aid setting up a portable, productive and secure remote development environment using Genero 3.20, suitable for using over a WAN.
Content
Server Side
Genero Suite Server 3.20 should be installed, with at least the Studio Server component selected to enable remote development. A licensed version of BDL needs to be installed and running on the server too. We find the Four Js Licence Manager the most versatile way to do this. Also, in one of the examples below, we’re connecting to the Genero Application Server; if you don’t have this installed and configured, the httpdispatch tool can be used instead for testing Genero Web Client applications.
The server can be any supported platform. We’re using Linux here as it tends to come with most of the required tools readily available, such as SSH and SVN servers. Both client and server machines should be behind configurable firewalls. This article assumes the client is able to SSH into the server over the WAN.
If you have multiple developers working on the same projects, we also strongly recommend setting up SVN or similar version control for your source code. This can be useful too even if there’s only one developer, providing an extra backup and automatic versioning of your code. We recommend SVN here as it’s integrated into the Studio IDE. The version control software doesn’t need to be on the same server, but must be accessible to the client to check code in and out.
OpenSSH Server can be downloaded and configured for most platforms. Setting this up, however, is outside the scope of this article. Luckily, most Linux distributions do come with it pre-configured. A suitable OS account with SSH and GST access will need to be available on the server. SSH is mandatory for Studio Server 3.20: the TCP method of access has been deprecated, and will only work on older GST servers.
Client Side
As above, this article is aimed at using the synchronisation method for use over a WAN: GST 3.20 or above therefore needs to be installed on the client. The local GST does not need to be licensed if it is only ever going to be used with a development server. The client can be any supported platform: we are using Windows 10 for this example.
To connect to the GST development server:
- Select Server Connections from the Tools menu.
- Click Add, and enter a name for the server connection.
- Enter the server hostname or IP address and SSH port.
- The default SSH port is 22.
- This port must be accessible from the client.
- An SSH server must be running on the server.
- The installation directory is the path to where GST Server is installed on the server.
- Enter a username and password for an account that has SSH and Genero Studio access.
- Click Connect to test access is working.
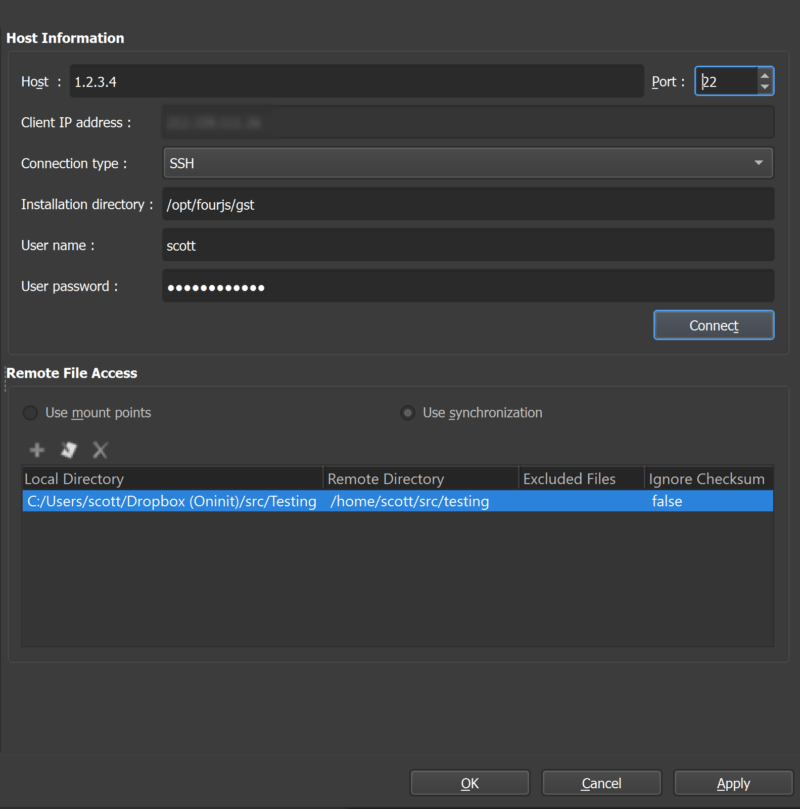
Next, the synchronisation directory(ies) need to be set up. Unlike the mount point mode, where the files only exist on the server, sync mode keeps a copy of the files locally, making operations such as editing and debugging much faster. Make sure the ‘Use synchronization’ radio button is checked, and click the plus sign to add a new directory.
- Create a new empty directory on the server.
- This is where the files will be synchronised to and compiled, etc.
- Make sure it has read/write access for the SSH user entered above.
- Enter or browse to the local directory.
- This is where your source code is going to be stored.
- This can be an existing source folder.
- Enter the full path to the remote directory.
- This is the path to the empty directory above.
- If you need any file types excluded from the sync, enter them here.
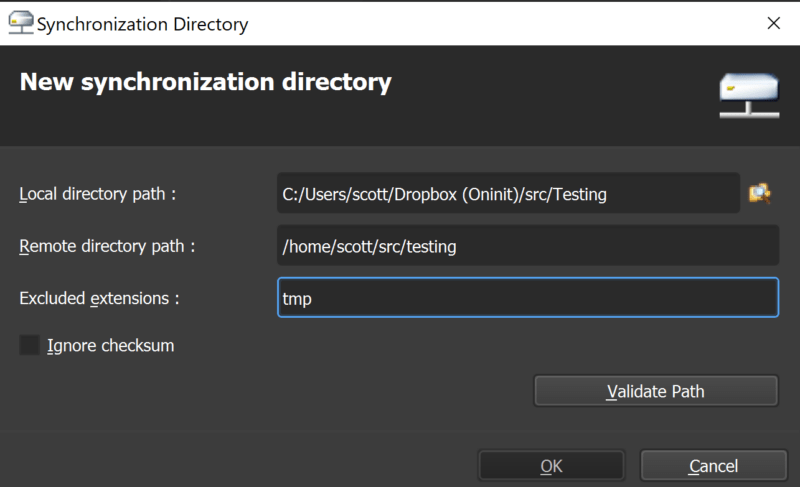
You can have as many synchronisation directories as you need. Clicking Validate Path will check the remote directory exists, is empty (or already used for synchronisation), and has the required permissions. Once validated, click OK.
The local folder can be any accessible folder on your workstation, including cloud storage. We like to use a Dropbox folder: this way if you lose access to your machine, or need to use another client for any reason, it makes migration or moving between a laptop and desktop seamless. This does not replace the need to use source code control: files can still be checked in or out of these folders with SVN.
Once added, your Genero files should now be stored in the local folder. Create a new project here or check out existing files into this directory. Once the project is opened in Studio, the files will be synced to the server. Certain operations, such as compiling, will cause a re-sync, with source files copied to the folder, and the compiled files being copied back. A word of warning here: never create or edit files directly in the server directory: these will be removed or overwritten on the next sync!
Another issue that can crop up is if your local Studio session doesn’t exit properly. When you run a remote session, a lock file in a hidden directory is created with the PID of the gsserver process. If your Studio session doesn’t exit cleanly, this PID is not removed, and subsequent syncs will fail complaining of a lock. If this happens and you are sure this is an error, edit the .gst/lock.info file, remove the PID and set the Locked value to false.
Executing Programs
As programs will be executing on the server, Studio needs to be configured to make sure the front end is displayed locally. There are two main options here: GDC or GWC, you may wish to configure one or both of these depending on your application.
GDC
There are two options here to enable the server to utilise your local GDC client: a reverse SSH tunnel can be set up to redirect port 6400 to your machine, or, if you have access to the firewall, a rule can be configured redirect this port permanently to your machine.
To do this with SSH (the command will need to be run after a reboot or if the connection is otherwise terminated):
Where:
- -R – Create a reverse tunnel
- 6400:127.0.0.1:6400 – Port to reverse:destination IP to redirect to:port on destination
- login@servername – Usual login credentials
Windows 10 has a built in SSH client that should work from any command prompt. Alternatively, the reverse tunnel can be set up in PuTTY (check the Remote radio button in the SSH Tunnels configuration page). The SSH server must be configured to allow TCP forwarding for this to work: this is the AllowTcpForwarding parameter in the sshd_config file.
Once this tunnel is up and running, any traffic directed to port 6400 on the server will be redirected to port 6400 on the client.
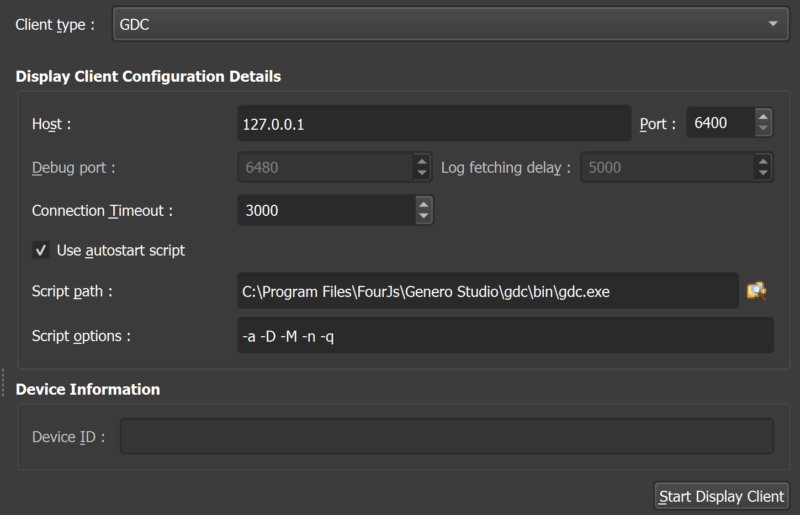
To set this GDC configuration in Studio:
- Click the configuration button in the bottom right corner of Studio.
- Check “Use Display Client”, then the edit button to the right of the drop-down.
- Either edit your current client or create a new one.
- In the GDC configuration, set Host to 127.0.0.1, and change the port if need be (make sure this is changed in the first part of the reverse tunnel parameter in the SSH command too though).
- The script path shouldn’t need to change: this should be your local GDC executable.
Alternatively, if you have access to the firewall your client is behind and need something more permanent, set the Host above to be your external IP address, and create a port forwarding rule on the firewall for 6400 to be re-directed to your local machine.
Executing a program in Studio now should run it on your local GDC.
GWC
Assuming you’re running over a WAN, and your development server is not exposed to the Internet, you will again need to start an SSH tunnel, this time a forward tunnel for HTTP traffic, as the web browser will be started locally:
This, again, can be done via PuTTY in the SSH Tunnels configuration page (local tunnel rather than remote this time). Make sure you are not running a local web server on port 80, as this can often take precedence.
To have programs run from Studio on the server with the front end in a local browser:
- Switch to your Web configuration and click the Configurations button (bottom right).
- Make sure the Use Application Server radio button is selected.
- Application type should be: Universal Agent.
- You can either choose a browser or leave this blank to run your default.
- Click the Edit button to the right of the drop-down.
- Either edit your current connection or create a new one.
- Host should be localhost.
- Port should be 80, or whatever your web server runs on (adjusting tunnel appropriately).
- The Connector is the section of your application URL following the hostname, the default being ‘gas’.
- If you’re not running GAS, you can use the start script option to start httpdispatch instead (changing the port appropriately, the default being 6394).

Executing an application should now start your local browser, running your app on the server.
Multiple BDL Versions
Genero Studio can be configured to run against any specified version of Genero. This can be set by choosing the Genero Installation in the configurations manager.
This can be very useful if you develop code for several clients running different versions of Genero. You can have multiple versions of BDL and GAS installed on the same server, and use symbolic links to point to the versions of those your clients are on. You can then create configurations for each client, setting the Genero Installation, display and application servers individually.
A word of warning, however: While Studio 3.20 can run and compile against older versions of BDL, the syntax highlighting, form and report editors will all allow for the latest features, which may not be present in the older versions.
Reports will also be created for the very latest version, with which the client may not be compatible. There is a work-around for this: the version number can be lowered by editing the 4rp file, and changing version=”x.00” in the second line. Please note: this is not supported, but should work as long as no features are present that the target platform does not support. To avoid these issues, the equivalent Studio version should be installed and used for each different version of BDL.
Migrating Studio Configurations
While using Dropbox or similar keeps your code portable, the Genero Studio configuration files are local to the client. This means if you wish to replicate your environment to another machine, you’ll need to re-configure all of the above and more.
There is a work-around for this: should you wish to copy your development server configuration, this is stored in the hosts .conf file, which can be found in %APPDATA%/Fourjs (or ~/.Fourjs on Linux) under a directory named with the Genero Studio version. Similarly, the Genero Configurations are kept in the same location, in the sub-directory called serverConf, in the studioServer.conf file. Copying these two files to the target device should copy over the majority of the setup for all of the above. We suggest copying these files to cloud storage once complete, should you ever lose access to your device or need to use a different machine.
Copying the above configuration files is likely not supported, but could save you a lot of time setting up a new installation. We would recommend against copying these files between different versions of Studio though, as this may well render the IDE unusable.
Caveats
Using Genero Studio over a WAN even with the new synchronisation method, will not be as fast as using it on a LAN. Depending on the speed of your Internet connection, there will likely be a noticeable delay when files are compiled while files are synced, especially with larger projects.
A couple of the work-arounds above may not be supported by FourJs. Please make backups first and only use these at your own risk.
While we stress the use of firewalls and SSH tunnelling above, working over a WAN is never going to be as secure as a LAN. Please check with your Information Security department before setting up such an environment.
Conclusion
Using the above features, the Genero Studio development can be made highly portable, allowing developers to stay up to date with modern working arrangements such as BYOD and remote working. By utilising cloud storage and source code management tools, migrating to a new device also becomes simpler.
Disclaimer
Suggestions above are provided “as is” without warranty of any kind, either express or implied, including without limitation any implied warranties of condition, uninterrupted use, merchantability, fitness for a particular purpose, or non-infringement.